Sunday, November 8, 2015

GRMQ's First Retreat....

It took some doing, but the retreat carried on even though several quilters who had enrolled failed to show due to illness and other commitments.  Even our great organizer, Kathy Nelson, became so ill she couldn't make it.  Several of us wanted to get to know her more and learn how she develops her beautiful modern quilts often shown in this blog.

The facility, the Christian Reformed Conference Center in Grand Haven, MI ,was gorgeous, as was Friday's weather.
 About mid-afternoon several of us took a walk to the beach, just a short ways.  The dune grasses are in fall mode as well as all the other flora.
 Later, another walk met up with a cloudy sunset.  The peacefulness was wonderful!


 Nature provides such a great inspiration for quilters, artists and humankind in general.  Dune grass with the red berries and purple whatever.....simple beauty.

 The black squirrels, about 6 of them, were scampering around harvesting nuts on Saturday morning. I haven't seen so many black squirrels since days living on Lake Erie in Ontario.


While we all accomplished a considerable amount of sewing the environment was wonderful!

Now for what we accomplished.....


Roleen's tree skirt will be gorgeous when completed.  This snowflake was almost her undoing though....just count of those pieces, some pieces only an 1"!  It took most of a day to assemble one with three more to do - but very well worth it.


Marcia, shown above in one of my many aprons made, was working on the block for the GRMQ monthly meeting....love her colors.


I need hostess gifts during the holidays so I was making the quick tea towel aprons shown on the hooks.


Quiet Norma cut and sewed her Craftsy.com quilt.  It looked very complicated.  I believe she's making two for her granddaughters who share a room.  Lucky girls!
 Adrienne's layout of a scrappy quilt she was working on is shown above.  Many of our machines faced the outdoors with a relaxing and beautiful view.

Camera shy Roni holds her beach quilt for her daughter.  The backing is a laminated fabric with a lightweight batting sandwiched in-between.  The colors are so cheery.  Since the laminate will be on the backside she wants to carefully tie the quilt together.  

 My longtime buddy and travel partner came on Saturday.  Robin is showing us her 2014 Sampler  from the Attic Window.  Rather than make a plain ordinary quilt, Robin has added prairie points and a banner type border.  It's tablecloth to use with her Fiestaware dinnerware.  The '30s fabric is perfect for the dishes.
 Robin also finished a Row by Row to use as a table runner.  Again, the snowman is the give away, it's from the Attic Window.  Kudos to Robin for finishing two projects in one day!

Many of us can spend considerable dollars buying rolling totes for our machines.  I was really taken with the Office Depot folding crate Robin uses to carry not only her machine but most of her tools, too.
Adrienne had another scrappy project started but was dissatisfied with it, thus no pictures.  :(.

A hearty thank you to Kathy Nelson for organizing this event for the last several months. Well, quilters, time to plan your calendars for the next retreat in April, 2016 at Lake Ann.


Monday, October 26, 2015

Wisha, Wooda......

The first GRMQ retreat is next week and it's my first over night travel for quilting trip.  Caroll D has lured me into Happy Scrappers, so I've become accustom to packing for a few hours of sewing - but two days....oh my.  My 24" ruler is too long for any bag I  as well as my portable ironing pad.  Then to pack my sewing basket holding my cutter, pins, threads, etc. space is needed.   While I'm only good for about 2 -21/2 hour sew sessions, my list of projects is not only long, its very thick and heavy.  To eliminate several trips of unloading a large bag is needed.  Ironically Costco has a freezer bag that can fit everything, however, it looks like small animals may have attacked the outside of it....it lays in the garage.  Thus, the "I can do that" attitude began.

With scrap pieces left over and not put away yet, I decided to make a retreat bag from my latest quilt.


 Here's where the Wisha, Wooda enters.  I wanted the bag to be padded and stiff, to protect my long ruler.  It's padded everywhere but only stiff on the sides, bottom and most of the back.  The bottom, back and top flap are one piece.  The fusible, stiff interfacing was limited, so I guessed at how to place it.  The front contains just batting.  Thus, I now wish it had stiffener as well.  Oh well!  It will still work for my needs.
 While the facings are thick, space is consumed by the thick seams, but the ruler can lay flat rather than on end, which I think will be okay.  My ironing pad/cutting board makes a great bottom and allows for its carrying handle.   With the plastic side down, waterproofing is there anyway.
For some reason I got lost along the way and  made 4 handles, when two sufficed.  I opted to attach all four and tie a knot in the center of each pair.  This way I can shoulder the bag or shorten it by a new knot for hand carrying. (Don't you just delight at how well I justify my mistakes, and I've never kissed the Blarney Stone).  While making the handles I eventually recalled a trick learned 30+ years ago from Stetch n Sew.  

For those persons unfamiliar with Stretch n Sew, it offered great methods of sewing knits during the 1960''s-late 1990's.  Short cuts and learning how to size patterns to our imperfect bodies was wonderful!  

 When making handles, belts or ties, (1) get a string. ribbon or a piece of fabric thinner and longer than what's being made.  Above, is a very long piece of twill tape ......
 (2)  Prepare the handle to the method you prefer, with right sides together.  I batted my handles so the outside fabric is on the bottom and batting on top.
 (3) Once folded in half, run the twill tape the full length of the handle, with a small bit extending on one end and a very long piece at the other end.  The twill tape runs along the fold.
 It's hard to see, but I've sewn across the top of the handle, then down the long side.
\

(4)  When done sewing the long side you're ready to pull the right sides out by pulling the long end of the twill.  It may take a few seconds to get it started but once you get the 'touch' the right sides show very quickly.   when turned carefully snip the "puller" and work the corners to a point.  It took Handle #1 about twenty minutes to pull through because laziness kept me from getting up and finding a puller.....I made and turned the other three handles in far less time than the first 20 minutes.  

While I wish I had waterproofed the outside, the bag will work fine next week.  I'm so excited to be on the Big lake for a weekend.  If interested in a day of sewing follow this link to our Facebook page outlining the  $10 fee and food requirements.  


Saturday, October 24, 2015

Retreat Time is coming.....

If you're looking for more time to sew, day slots are still open for The Grand Rapids Modern Quilters first retreat.  Remember?  This is the weekend, for those of us staying over, on Lake Michigan!  If this Michigan weather holds, it should be gorgeous for both sewing and walking the beach!  If you're interested send a Messenger message via Facebook to Kathy Nelson.  GRMQ has a Facebook page.

Since the retreat is Halloween weekend, I have some Witches Brew and special paper plates just for the occasion.  I'm making a travel bag for my mats and rulers, fashioned after a large Costco freezer bag.  Will let you know how it turns out later this week.....

The Stitched Studio Beehive meeting is Monday....this group is so much fun!  The amazing combinations of fabrics is inspirational.  Here's my block.  Danielle allowed us to choose two fabrics from her stash (what a great way to use fabrics) and instructed us to add a solid or a metallic fabric.  I have no metalic, so I stepped out on the pink.  She is decorating her sewing room to be very girly!  Had to be a pink, right?

We share our photos on Instagram during the month.  Instagram is another new technology app that is fun and so much easier than Facebook.  Just post pictures, with or without hashtags* (specific identifiers).  Look for us, Stitched Studio GR Modern Bee, on your tablet or smart phone! I follow NatGeo and the ISS (international space station)...amazing photos everyday.

If you were raised thinking your house had to be clean before you could settle into sew, the following may be the blame....enjoy!

Have a great day!

*  In case you wonder if I ever proofread, I do try.  Today I did catch an autocorrect....hastags became hostages!  LOL


Thursday, October 22, 2015

The Sun has been shining!

While Michigan can have its blurry and dreary days, this past week or so has been wonderful!  Really, too pretty and nice out to sew.  So.......

Monday was my autumn to do list!.  Since I have told you enough on this quilt, but just had to show this newly washed quilt blowing in the fall winds.  The tree colors all around were and still are perfect and the billowing quilt just made life seem more wonderful than it is!  To continue the country and cozy feeling of quilting and all that goes with, I decided to do my local farm tour for fall produce.

While not in order (still learning this pic stitch app) here are my favorite local farms.  Upper left is a Brechting.  Their family farm store is on 6 Mile just west of Alpine.  The bags of onions and potatoes are common there.  They grow the longest carrots I have ever seen, all for a $1/bag!  The peppers are common at Under the Pines, on Alpine just north of 7 Mile.  They open in the early summer, have several stands in the markets around Kent County, but here is the Mothership!  I have never seen so many variety of peppers representing several ethnic group favorites....Hungarian, Hispanic etc.  While not a big pepper eater I LOVE the colors.  Lower left is the sweetheart of all "roadside" stands, Bernie Klein.  The Happy Apple needed new digs this year as their farm is in Ottawa County. Bernie has been running the family stand for years....along with daughter-in-law Tammy and several grandchildren and great grandchildren.  The corn shown is from there.  Her son owns the farm and had an empty piece of land and decided to try a late planting.  The corn was wonderful....a summer treat in late October.  The colors along Walker Road were magnificent!   Oh!  Brechtings have had their own brussel sprouts for sale.  Unlike the Urban Market farmers, they won't sell their sprouts until after a frost....they're sweeter then!  All three families:  The Kleins' Breathings and Homrichs have been long standing leaders in Kent and Ottawa counties and also the farming community.


 My haul for trip, after about an hour, with the dogs of course, is shown.  The pumpkins are now pies and the apples are baked into two Amish Pies and two loaves of apple bread.  The apples were so large this year, an absolute delight to peel, that I have enough for two more pies!  Tomorrow!
As this week has continued....a wild turkey from up the block sauntered down my way.  A neighbor walking her dog rang my door bell for us all to watch glide over the yard and cross the street! He, the turnkey, was unfazed by my barking dogs and the cars!  Thanksgiving is coming folks!  Ever try wild turkey?  So good....not tame like our traditional store bought kind.


Also, as a follow up to my QAYG method, I found this video, I hate watching these things-but she's pretty good - and I like her method....she abuts the seams....The Gourmet Quilter! Enjoy!

Tuesday, October 13, 2015

QAYG My Way

It's very common now for the quilt bloggers offering a quilt as you go( QAYG )method.  I have tried several methods, including the early method that keeps the back looking more traditional - one piece.  My newest journey began watching my buddy Caroll D teach her class on QAYG ala The Quilting Edge technique.  I just started with this method wanting only the sash joining process.  I did it on this quilt:


The other two tops from this BOM experimented with various sash widths.  These quilts have added strips on the front and back by cutting batting strips to size and adding strips to cover.
 The top selection has narrow strips whereas this quilt has wide strips.  The back below worked out the best as I limited my choice of fabrics and thread choices.


Recently, I've had larger quilt tops to complete and really wanted to work the technique a bit.  Larger batting strips are far easier to cut than 3/4" strips.  It's a great way to use scraps but so annoying with 20 squares or more to connect.  Traditional sashing of 2" would make the quilt larger than I wanted.


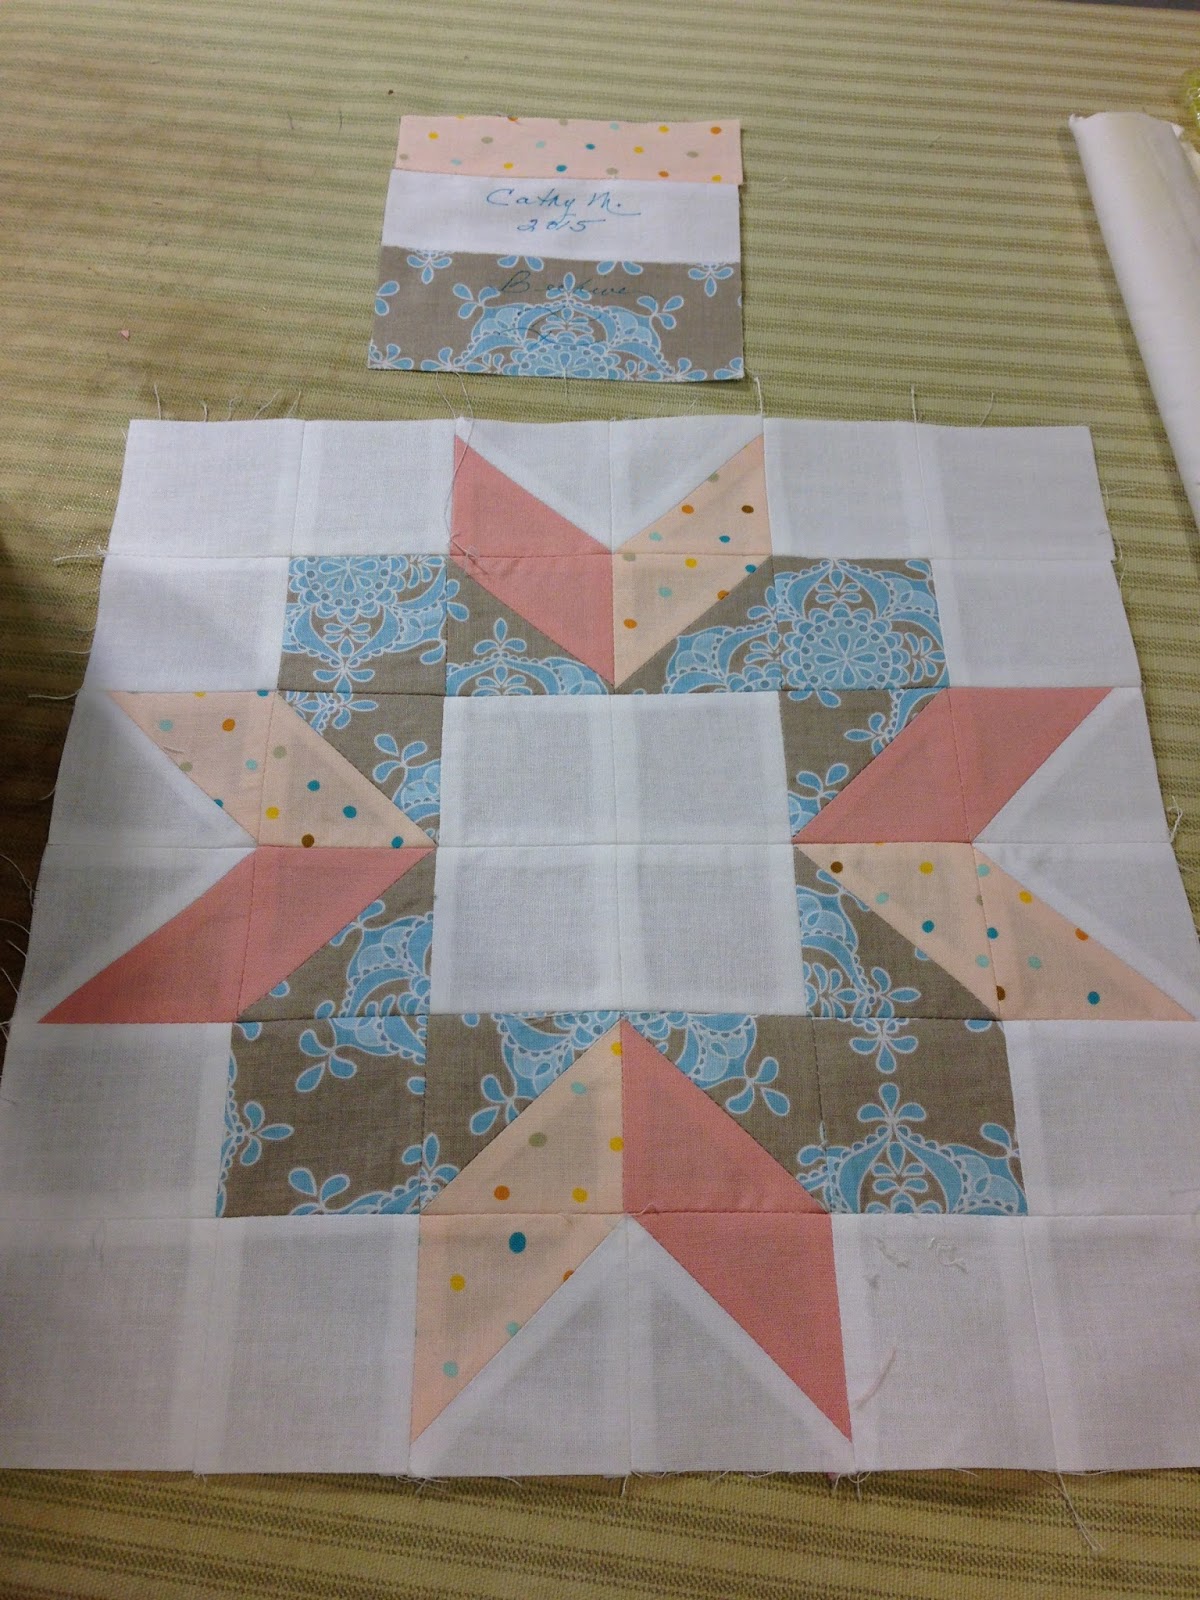
On my Beehive quilt, below, I wanted to play more and experiment with several things:  stitches, fabrics and techniques.  The top's connectors, using the seam allowance as batting, are attached with no top stitching, similar to how sashing is normally attached.  On the back, however, only one edge can be attached from the underside.  One side must be topstitched.  In the original or "traditional" method taught, this edge of the strip is hand stitched. The traditional method doesn't have the long line of stitching showing, but wasn't going to hand stitch all these blocks.  I used my machine, hoping to disguise the  bobbin stitching-now on the right side- with overall quilting. Well, nothing is quite that simple in my world.  The quilting on the top, in this case, involved decorative stitches around each of the circles.  What to do with the somewhat, mostly straight line, now showing....use matching thread.  It provides a border, of sorts, to the seams.


 With the Circle Quilt narrow strips of 1 1/2' of a fabric were cut with both long edges pressed to the center.  This strip was then placed over the space created by the topside's sashing strip.  It worked ok, but the iron's steam was a bit too hot on the finger tips.  Thus, the method I used below was devised.


Unlike the other quilts, this top had a very defined pattern and did not require any top sashing.  Yeah! I quilted as I goed,  QAYG, all three layers, in blocks of four.  Each four patch was about 18".  The quilting required more planning than I usually do.   All in all the machine quilting was no more than one long row of four four patch blocks.   The large squares I practiced free motion with my new machine - not so good, but the thread is hidden (learned that lesson finally).   Now for the backside.

 I alternated four fabrics behind the front's four patches.  The connecting sashing matched one of the backings, as shown in these two pictures.

Since I used the seams allowances, 1/2" (two 1/4') as my batting, I just needed to add a strip.  The picture below shows the strip topstitched.
While the strip may not be as smooth as other methods, I enjoyed this method, it met my emotional standard.

Here's how I made the strips:


 Steam press the seams open and make them flat as possible.
 Cut a strip long enough for your block 1 1/2' wide.  Since I'm not as an exact sewer that I dream I am, I strive to make things to work.  Sew the strip, wrong sides together with 1/4" seam allowance. While opening the tube by pressing the center, align it to the strip's edge as shown above.
 With your flattened tube strip, trim the allowance down to 1/8".  At first I left the 1/4" and threads from the edge peeked out .  Yuck.  The trimming moves the raw edge away from the topstitching edge.
With the right side of the strip up, lay it on top of your flatten seam allowance and top stitch close to each edge,  to the end.  (This strip is perpendicular to the seam it will cover for illustration purposes only.)

Here's a completed block also showing, look closely, that because of the pattern on the topside, this vertical stitching won't really conflict.  

Lessons learned:
  • QAYG will make the topside blocks smaller.  I chose to space the vertical quilting the width of my walking foot.  This pattern has considerable blank space and required something.  The angle of the patterns also led to straight line quilting.  The heavily quilted blocks differed in size with the less quilted blocks.
  • If to do over?  Space vertical lines further apart....this quilt is really heavy!
  • Limit thread color choices.  On the Circle Quilt I was changing thread colors endlessly since I was rotating three fabrics and the top had several background colors, too.  I really think I wore out a seam ripper on that quilt.  On the Star quilt I used either white or a lime green.  Even then when applying strips, make sure the bobbin thread matches the top background fabrics....
  • The smaller quilts, like the very top examples, work better for some one like me who reaches the need to be done....more than anything.  
I hope this experience of experimenting helps you try QAYG in some method.  Just Google QAYG and you'll have severals tutorials from which to choose.

In case you're looking for a fast quilt, this pattern by Amy Gibson of Hickory Dickory Dock, has it now on her website.  I purchased it as a Craftsy.com kit.  In case you're wondering, I have a good amount of fabric left over.  Not enough to make several other quilts, but enough that I think I'll go back to The Quilting Edge and try that method.....great for scraps of all sizes.  The Craftsy.com kit was generous, but not too generous....just right.